Alright, let me tell you how this whole Buffalo Bills wrestling belt thing came about. It wasn’t some grand plan, just kinda happened. I was watching the game, maybe had a few too many Labatts, and saw one of those replica belts someone had. Looked cool, but kinda generic, you know? Thought to myself, “I could probably make something better, something really Bills.”
Getting the Idea Rolling
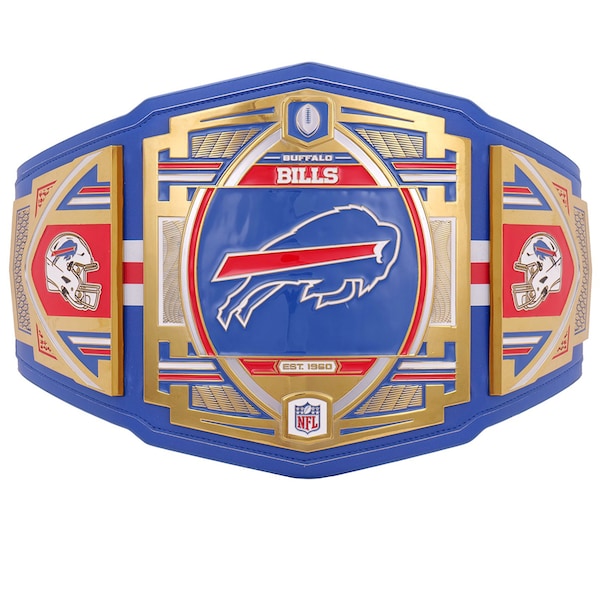
So, the idea stuck in my head. A proper championship belt, but drenched in Bills Mafia glory. Not just slapping a sticker on it, but making it feel like ours. I started messing around with some sketches on a napkin first, then moved to some scrap paper. Figured out I needed a big main plate for the charging buffalo, then maybe some side plates. What for the sides? Maybe the standing buffalo? Maybe helmet logos? Decided on the classic standing buffalo and maybe the ‘Bills’ wordmark for the smaller ones.
Hunting Down the Parts
This was the tricky bit. I ain’t got a metal shop in my garage.
- The Strap: Looked online for a blank belt strap. Found a decent black fake leather one that looked wide enough and tough enough. Didn’t want real leather, too much hassle caring for it. This one already had the snaps, which saved me some work.
- The Plates: This took some digging. Found a place selling blank metal plates – you know, the kind people use for customizing replica belts. Ordered one big main one and four smaller side ones. They weren’t fancy, just plain metal shapes.
- Paints and Stuff: Hit up the craft store. Grabbed some good quality acrylic paints – had to get the exact Bills blue and red, plus white and silver for details. Needed some strong glue too, something that would hold metal onto fake leather. Picked up some sealant spray to protect the paint job.
Making the Plates Look Right
Okay, plates arrived. Plain ol’ shiny things. First, I roughed up the surface just a tiny bit with fine sandpaper so the paint would stick better. Cleaned ’em off real good.
Painting Time: This took patience. Lots of it.
- Printed out the Bills logos – the charging buffalo for the main plate, standing buffalo and wordmark for the sides. Sized ’em just right.
- Used the printouts like stencils, carefully tracing the outlines onto the plates with a pencil.
- Started painting. Layer by layer. Let the blue dry completely before adding red. Let the red dry before adding white. It took ages. Had to use tiny brushes for the details on the buffalo. Steady hands, folks!
- Made a few mistakes, wiped ’em off quick with a damp cloth before they dried. Touched things up.
- Once all the paint was dry – like, really dry, waited a whole day – I took the plates outside and gave them a couple of good coats of clear sealant spray. Made ’em look finished and hopefully keeps the paint from chipping off first time I wear it.
Putting It All Together
Now the moment of truth. Laid the strap flat. Figured out the spacing for the plates – wanted it to look balanced. Marked the spots lightly.
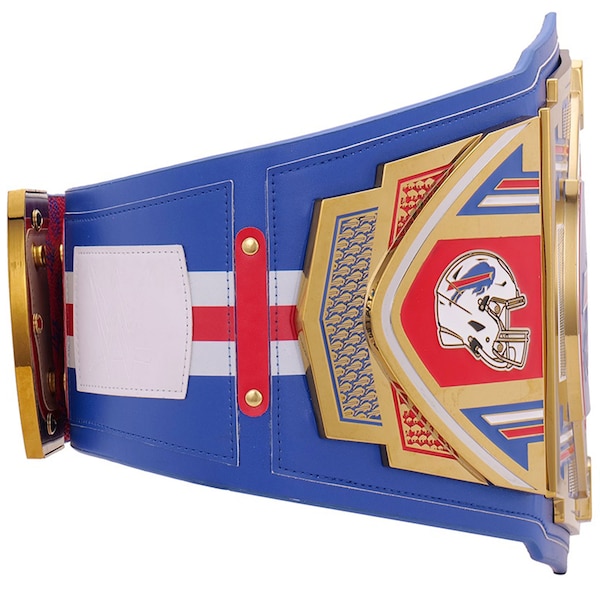
Got out the heavy-duty glue. Applied a generous amount to the back of the main plate, carefully positioned it on the strap, and pressed down hard. Put some heavy books on top while it dried. Did the same for the side plates, one by one. This glue smelled awful, had to open a window.
Let the whole thing sit for another full day, just to be sure that glue was rock solid. Didn’t want plates falling off during a touchdown celebration, right?
The Finished Product
And bam! There it was. My very own Buffalo Bills championship belt. It’s not perfect, paint lines aren’t laser-straight if you look super close, but it looks awesome. It’s got heft. It feels substantial.
Tried it on. Snapped it closed. Felt like a champ, ready to go through a table (kidding… mostly). It’s definitely unique, way better than those generic ones. Took some pictures, felt pretty proud of the effort. Now I just gotta wait for the next home game to show it off.


